Monkey Pose - Hanumanasana
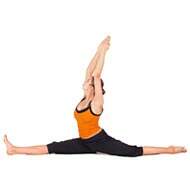
Hanumanasana or the Monkey Pose is also referred to as “the split” by yoga practitioners. This pose resembles the advanced leg stretch that helps in stretching your hips and making them flexible.
The Yoga Monkey Pose helps open your hips squared to the front.
The Monkey Pose gets its name from the Hindu Monkey God Hanuman.
To complete this pose, you need to practice leaping from one side to the other and back. One of the most effective Monkey Pose tips is to incorporate many hip-opening exercises and leg stretches into your warm up routine, just before you try to execute the pose.
Many yoga experts recommend that kids practice the pose since they are more flexible than adults. Hanumanasana is a complex yoga pose and it is important that you only practice it under the supervision of a yoga expert. This will minimize risks of any injuries.
Steps :
- Start by kneeling upright; place your knees a bit apart. Place your right foot forward, around a foot or so in front of your left knee and turn your right thigh outward. To do this, you will need to lift your inner sole away from the floor, so that your foot rests on your outer heel.
- Breathe out and bending your torso forward, press your fingertips to the floor.
- Gradually, move your left knee backwards. Straighten the knee and simultaneously, lower your right thigh, towards the floor. Just before you feel you have reached the limit of your stretch, stop straightening your left knee.
- Next, start pushing your right heel away from your torso. Gradually, start turning the leg inward while you straighten it and bring your kneecap towards the ceiling. As your front leg becomes straight, start pressing the left knee backwards once again. Carefully, drop the front of the left thigh, along with the back of the right thigh towards the ground. The center of your right knee should point directly towards the ceiling.
- Ensure that your back leg is extended straight out behind, from the hip, without being angled out to the side. The center of that kneecap should press on to the floor.
- Extend the heel of the front leg and lift the ball of the foot towards the ceiling. You could either stretch your hands straight up (towards the ceiling) or bring them together in the Anjali Mudra (Salutation Seal)
- Hold this pose for around a minute before releasing it. To do so, press your hands on to the floor and turn the front leg out slightly. Slowly, return your front heel as well as the back knee to the starting position.
- Repeat the exercise, using the other leg
Precautions :
- Do not practice this yoga pose in case you are suffering from any injuries, especially in the hamstring or groin area.
- While practicing the pose, go slow and be careful at all times. This means that you should not push your body, beyond its limits of comfort.
Forcing any yoga pose can lead to an injury and the Monkey Pose, being such an advanced one, is no different. - With regular practice, you should be able to execute the split all the way, but until then, only go as deep into the pose, as your body comfortably allows you to.
Beginner’s Tip :
Even those who practice yoga regularly may find it difficult to perform the Monkey Pose the first few times. For best results, you should learn the pose from a qualified yoga teacher, who can guide you about the proper alignment of your body, before you practice it on your own. Also, to reduce the risks of injuries, make sure that you warm up your legs thoroughly, before you try to execute this pose. While performing the Monkey Pose, ensure that your hips are squared to the front.
Another interesting beginner’s tip for the Monkey Pose is to press your back foot firmly into the floor and lift your shoulder blades into your back. This will help you increase the length of your torso and spine while performing the pose.
Beginners can practice the Monkey Pose, by placing a blanket under the knees and ankles. Avoid using a sticky mat, as it will keep you from sliding forward comfortably.
Benefit To Body Part :
- Legs: This pose is excellent for your legs. The benefit to the body part is that it keeps your legs supple and flexible. This will reduce the risks of injuries, while you engage in other activities such as jogging, sprinting, cycling or climbing.
- Abdomen: The Monkey Pose stimulates the various organs in your abdominal region, improving their overall functioning. Moreover, the abdominal muscles also get toned up with this exercise.
- Hip: Practicing this pose on a regular basis opens up the hips and the groin region, increasing your overall flexibility, balance and alignment.
Therapeutic Applications :
- Performing the Monkey Pose regularly helps prevents sciatica. Those who are already suffering from the condition could practice the pose carefully, to reduce the pain.
- This pose improves the flow of blood to all the parts of the body, especially the abdomen and your skin. This improves digestion, gets rid of the toxins from your body and keeps you looking fresh and younger.
- In case you suffer from insomnia, this position could help your body re-establish its normal rhythm. The Monkey Pose also relieves stress, which improves sleeping patterns.
Variations :
- Place your hands on yoga blocks to support your body and bring your torso more upright.
- Put a block under your hamstring, in case your front leg does not reach the floor
- Use a yoga bolster or a firm blanket to support your pelvis, if it doesn’t reach the floor
Given below are the advanced variations for Monkey Pose:
- When you stretch your hands overhead, try to add a backbend, if you are flexible enough
- Lean forward over the front leg that is extended and hold on to the foot with both your hands. Make sure that your hips are squared and your legs at straight while you do this. Hold this pose for about 10 breaths and then bring your torso upright, as you inhale.
Preparatory Poses :
- Seated Forward Bend (Paschimottanasana)
- Head To Knee Pose (Janu Sirsasana)
- wide-Legged Standing Forward Bend (Prasarita Padottanasana)
- Fixed Firm Pose (Supta Vajrasana)
- Reclining Bound Angle Pose (Supta Baddha Konasana)
- Reclining Big Toe Pose (Supta Pandugusthasana)
- Wide-Angle Seated Forward Bend (Upavistha Konasana)
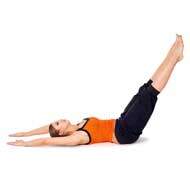
- Upward Extended Feet Pose (Urdhva Prasarita Padasana)
- Standing Forward Bend (Uttanasana)
- Hero Pose (Virasana)
- Cobbler Pose (Baddha Konasana)
Follow Up Poses :
- One-Legged King Pigeon Pose (Eka Pada Rajakapotasana)
- Dancer Pose (Natarajasana)
- Seated Forward Bend (Paschimottanasana)
- Wide-Angle Seated Forward Bend (Upavistha Konasana)


