Yoga for orthopedic problems

Yoga is so widely practiced today not just because of its psychological benefits, but also because it is effective in strengthening the body and toning the muscles. Many orthopedists recommend yoga as a natural way to relieve musculoskeletal problems. Yoga may not be ideal for everyone, just like any other form of exercise, and therefore people with orthopedic conditions should consult their doctors before beginning a yoga routine. Those who obtain benefit from yoga report many positive effects such as reduced lower back pain, less muscle tension and better posture.
Beneficial yoga postures
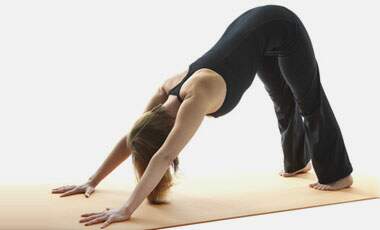
Adho mukha svanasana (downward facing dog)Orthopedists often recommend this yoga posture to their patients. This is one of the most basic yoga poses which helps to stretch the spine, shoulders and back. Most of the time, these parts of the body stay hunched and compressed due to poor posture and hence this pose is extremely useful. In addition, the leg, feet and toe muscles also receive a workout. Since the body is slightly inverted during this pose, the blood flow to the head increases.
How to do it:- Stand with your feet slightly apart (hip width apart). Balance your weight evenly on your feet by ensuring your toes are spread.
- Bend forward at the waist, keeping the back straight and place your palms on the floor with the fingers spread for a better distribution of weight. Keeping the palms flat helps to reduce tension in the wrists.
- Try to keep your feet flat and prevent your knees from collapsing inwards.
- Lift your hips upwards so that your body forms an inverted “V”.
- Press your chest in the direction of your knees and keep your gaze on your toes, while pushing the heels to the floor.
- Take a deep breath and allow your body to move deeper into the posture as you exhale.
- Keep the back straight throughout and avoid letting your lower back collapse.
- To come back to standing position, first bend one leg and draw your foot closer to your hands. Do the same with the other leg and slowly straighten your body.
You can even begin this pose from a kneeling position by using these steps:
- Get down on your hands and knees, with your hands positioned beneath the shoulders and knees beneath the hips.
- Push the balls of the feet against the floor with the toes curled inwards and lift your hips upwards to form an inverted “V”.
- Continue the rest of the pose as you would in the standing position.
With this pose, you can strengthen the lower spine area and widen the rib cage for better breathing. It also gives the hip muscles and upper legs a good stretch along with engaging the shoulders, arms and wrists.
How to do it:- Lie down on the floor on your abdomen with your legs straight and slightly apart. Extend the toes outwards.
- Draw your hands up and place your palms by your side so that your fingertips are beside your chest.
- Squeeze your elbows to your body and raise your upper body off the floor, allowing your back to arch naturally. This position constitutes another pose known as Bhujangasana (cobra pose).
- Straighten your arms and raise the front of the legs upwards. Keep your neck elongated.
- To end, bring your body gently back down.
Other beneficial yoga poses include Urdhva Dhanurasana (Wheel pose) which is an advanced pose that stretches and tones the back; and Ardha Matsyendrasana (Half Spinal Twist) which helps to strengthen the spinal area, stretch the buttocks and legs while improving mobility of the lower back.

 Yoga for PTSD (Post Traumatic Stress Disorder)
 The 10 Principles of Yoga
 5 Best Yoga Apps
 Anti Gravity Yoga